Kobaien sumi ink sticks - an incredible 400-yr old tradition
In these days of searching for instant gratification, of replacing tradition and craftmanship with the quick and cheap, seeing a company thriving globally by doing things exactly how they were done almost 300 years ago gives me hope for us and for our collective global culture.
When I first heard about the tradition of making sumi ink sticks, almost 2 years ago, I never thought that on Boxing Day 2023 I would find myself inside the Kobaien factory, a company owned and ran by the same family since it’s creation almost 400 years ago, capturing that entire process for myself. By the time I crossed the threshold into the ancient complex at 8am, it marked the culmination of almost 18 months of research, hundreds of emails, dozens of dead-ends and failed starts but also the development of some truly wonderful relationships - even friendships - and a renewed view of what great collaborative projects can be like. So, as I drove to the site, I felt this enormous sense of responsibility to translate this ancient tradition into images which would do it justice. Easy-peasy, right?
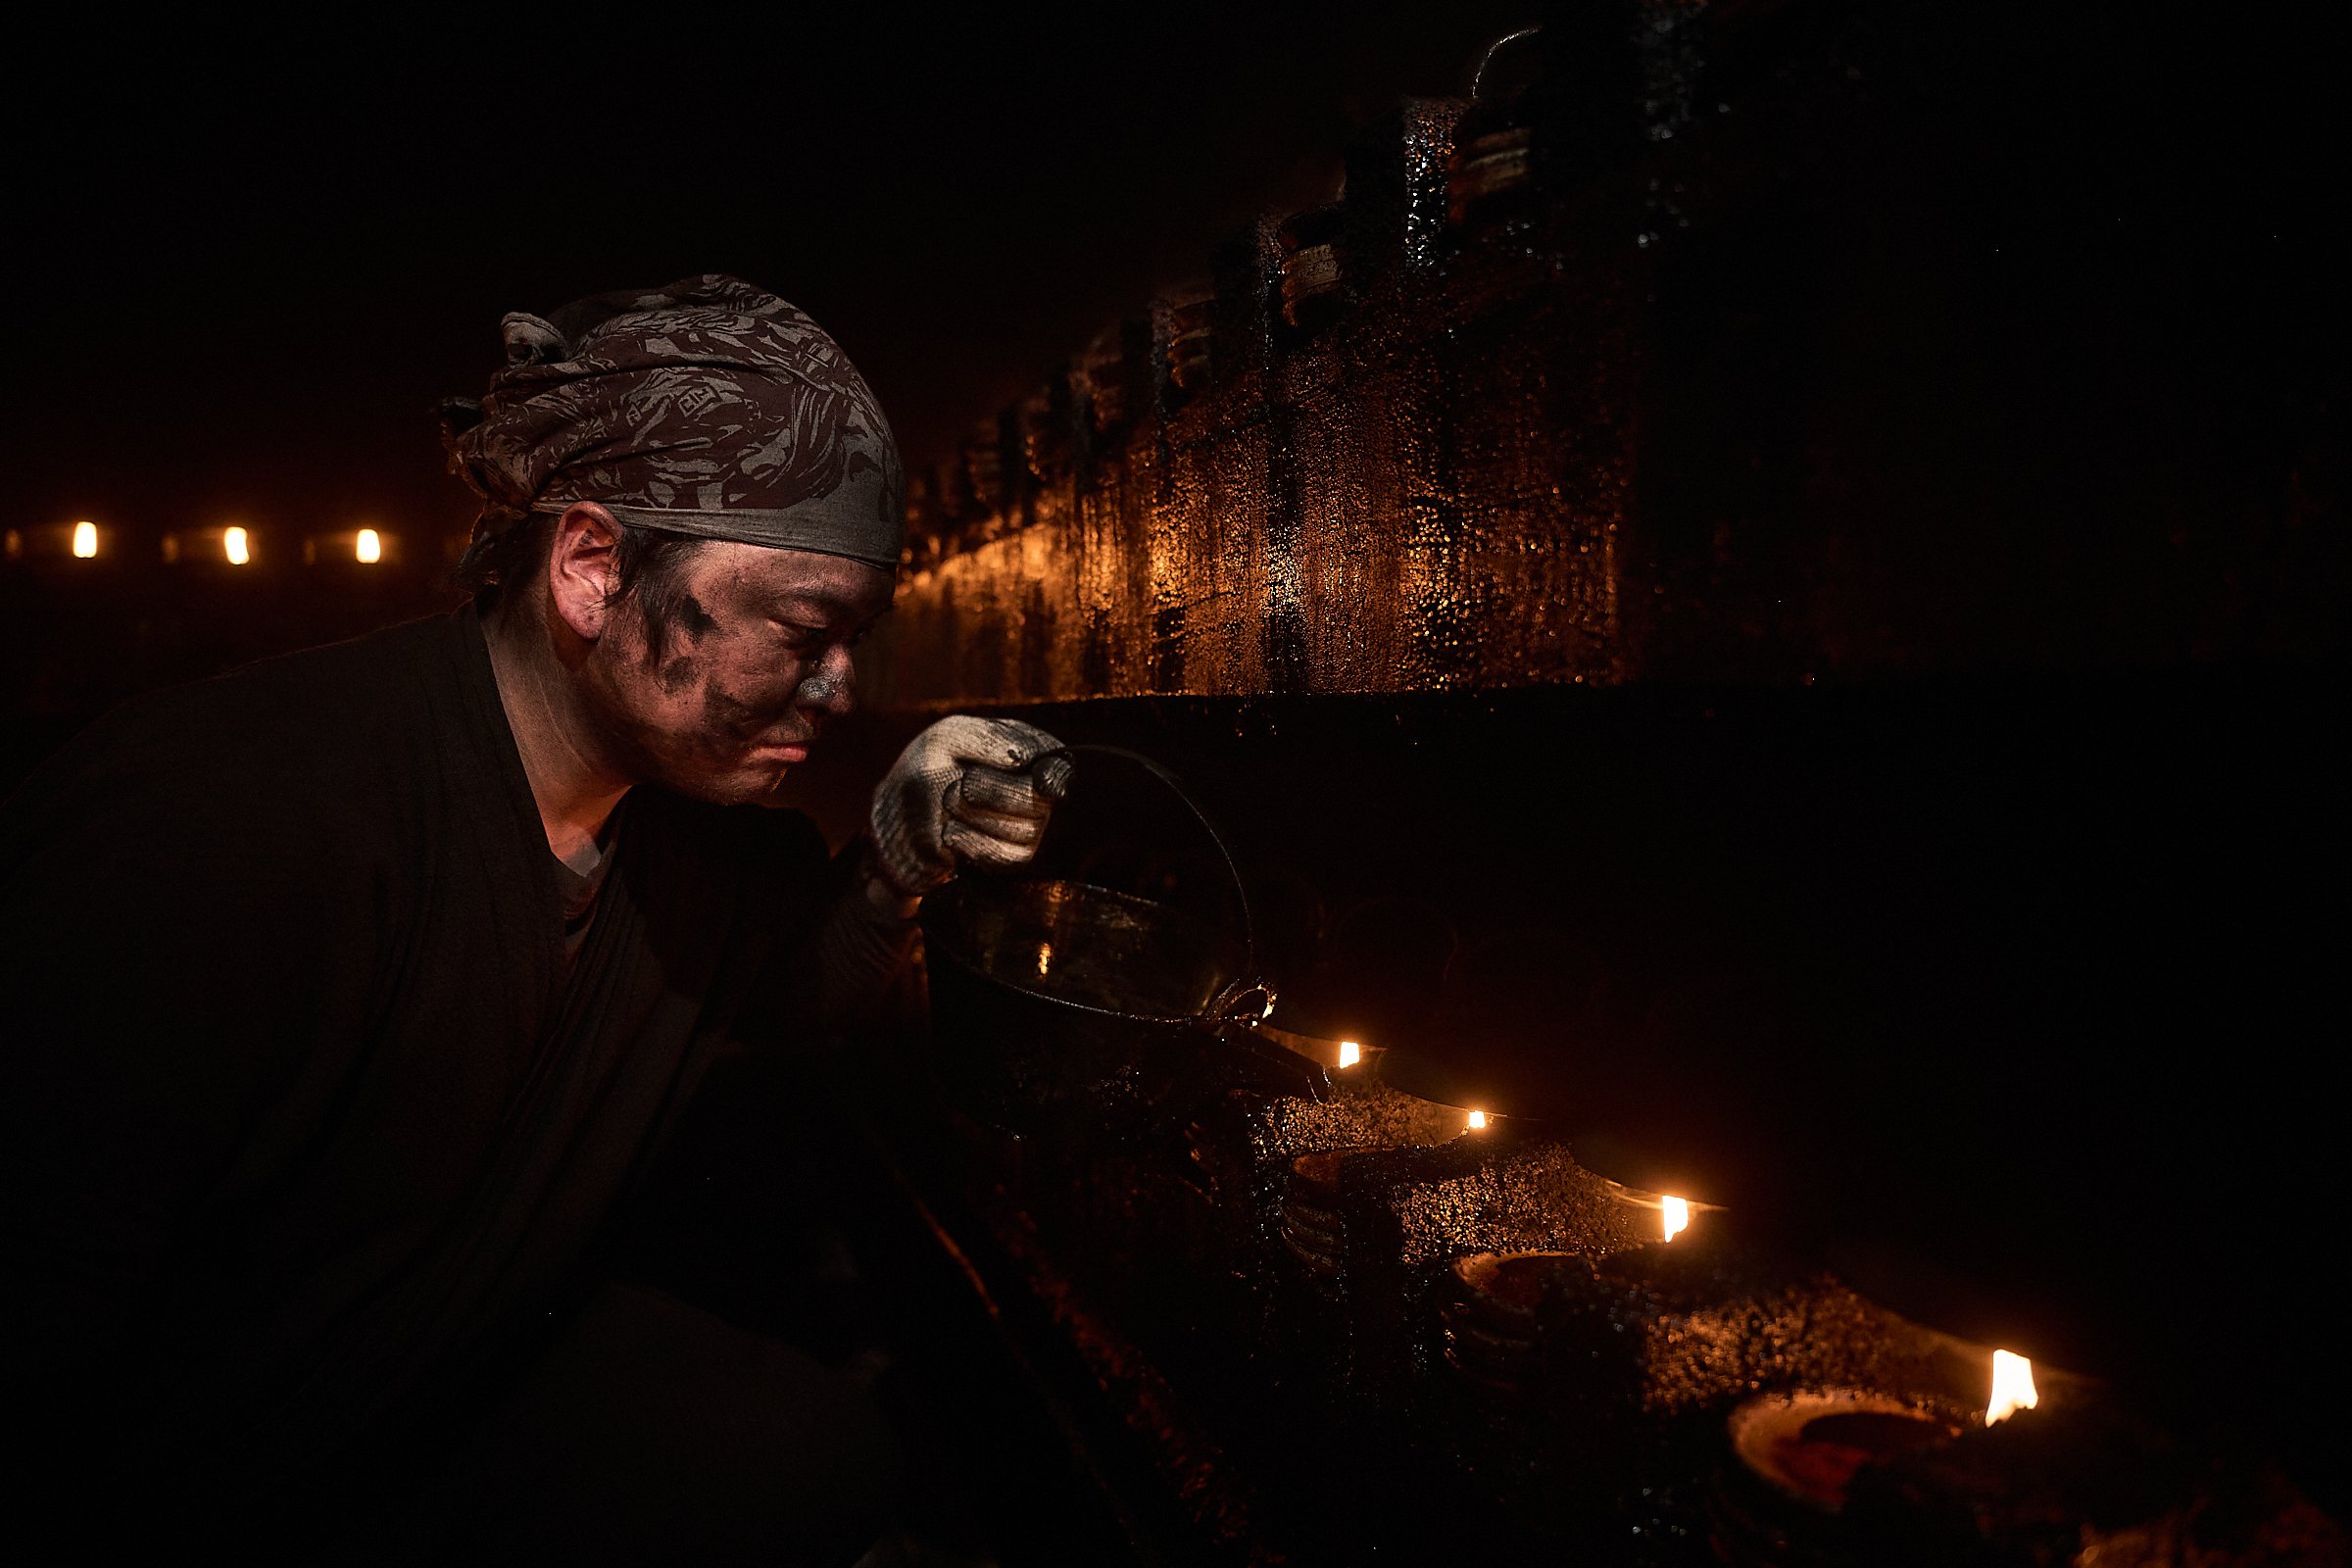
“Gathering smoke” is the almost mystical process of collecting soot inside temple-like rooms, using methods unchanged in almost 300 years
Now, before I get into the story and the images, I feel I need to take you on a little journey - a sampler if you want - of what I went through to get to the end. I started by researching everything about ink sticks (back then, I had not yet come across the name Kobaien or even knew the ink was called sumi) but there was very little out there - a couple of videos (only one of which was even halfway informative), a couple of articles referring to the process (but nowhere near as complete or informative as I needed them to be) but that was pretty much it. I was beginning to think this would be a dead-end (like so many other projects over the years) when I came across the name Kobaien. Looking into the company I found what I was looking for - but this was a Japanese company, almost opaque to a western photographer, and no matter how much I tried, I could not find a local contact who either knew the company OR had any experience in facilitating a documentary project there.
So, after months and months, I did the last thing I could think of: I emailed the info email at the bottom of their website. To be honest, I really never thought I’d hear back from them but guess what? Within 4 days someone from Ichi, the main sales distributor for Kobaien, replied with absolutely positive news! I don’t have video evidence, but I really did a jig when I read the email! That first exchange with one of Ichi’s senior managers was the beginning of an incredible collaborative journey - and dare I say, the beginning of a friendship with the incredible Keitaro - and over the next 8 months we hammered out the details of a two-day shoot on-site in Kyoto. And I do mean details: process details with timeline steps, shot lists, descriptions and expectations, equipment and so much more.Additional text
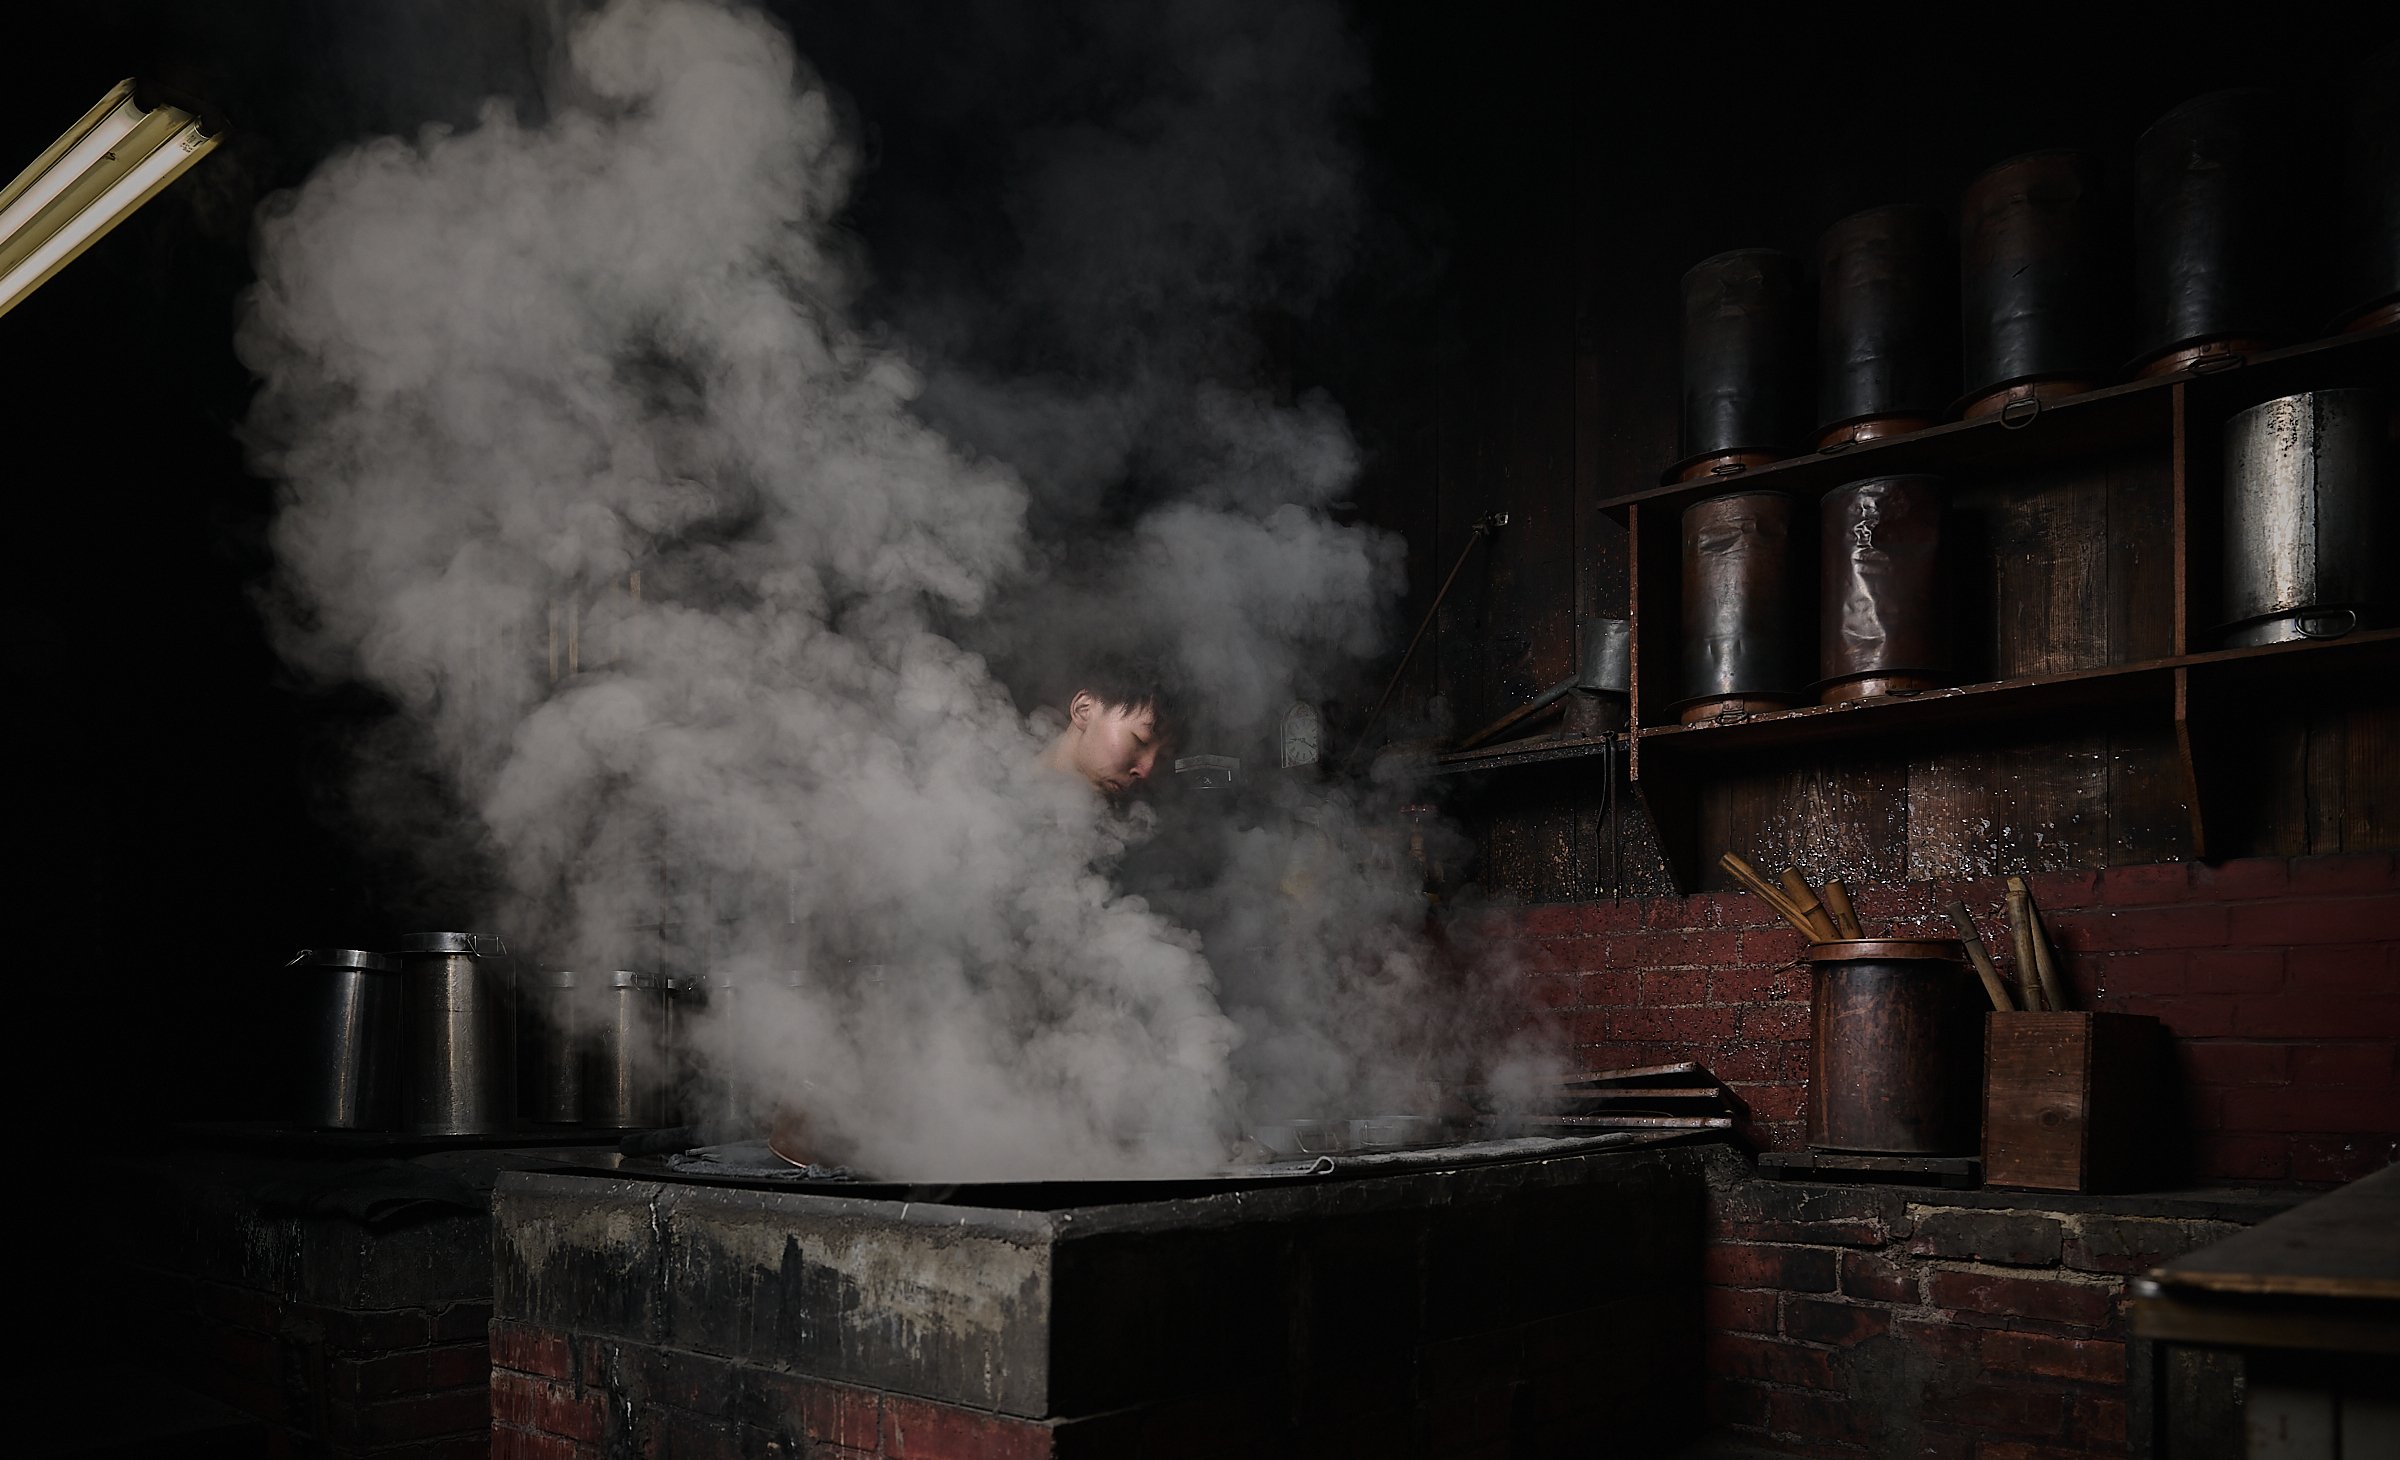
Melting animal glue and mixing it with water and perfume is a critical part of the overall process and probably one of the most time-sensitive ones.
But back to the story.
Creating sumi ink sticks is a really complicated, time-sensitive process which, in 2023 is still done in exactly the same way, with exactly the same materials and equipment (oh yes, raw materials AND equipment) as it was more than a hundred years ago. If you think about it, you’ll realise just how incredible this is - at a time when everything changes on a daily basis, Kobaien are still maintaining an incredible tradition. Just for that I think we should all be in awe of their dedication and commitment.
What is the process? In very simple terms, it comes down to five basic steps (please bear in mind this is not intended to be a detailed description of the process - for more details please check here - this is a quick overview designed, mainly, for photographers):
A. Gathering Smoke
Yes, this is as awesome, complicated, mystical and amazing as it sounds (by the way, this is what Kobaien calls it and I have to say, I love the term). What this stage involves is gathering soot, created by burning manually, custom-made, thick straw wicks dipped in vegetable oil in specially created clay pots covered by custom-made covers. The pots are located in two large rooms, lined in multiple rows, filled to the brim with oil and lit for 8hrs a day. They are monitored diligently by up to 4 people throughout the entire day.
As the wicks burn, thick powdery soot gathers on the underside of the pot covers (which are placed slightly off-centre to allow oxygen to reach the flame). To ensure the soot remains soft and evenly distributed, the covers must be rotated every 20’ (on the dot - a couple of minutes after and the soot starts burning, making it useless) until the entire underside is coated. After each full cover rotation, the covers are removed momentarily and the soot brushed off using custom-made chicken feather brushes. Throughout the process, the wicks themselves and oil levels are monitored, oil is constantly replenished and the wicks replaced to ensure soot generation is optimal all the time.
The gathered soot - between 8-10kgs a day - is collected carefully and stored, sometime for months, before it can be used in the stick-making process. This allows any residual moisture to evaporate and the soot to settle, any moisture to evaporate, making it easier to work with in the subsequent phases. Think about it - soot has the weight and consistency of dust and yet the Kobaien people collect kilos of this every day through this highly time-sensitive and detailed-oriented process!
Mr Aiba, the smoke gathering expert who manages hundreds of clay pots as they burn for 8hrs a day maintaining a constant rate of burn and soot collection
Replenishing the oil and checking/changing the wicks is absolutely critical to ensure the produced soot is of the desired quality and quantity. Covers are rotated every 20’ to ensure homogeneous soot distribution
The people working in the smoke collecting rooms have, I think, one of the hardest and most glamour-less jobs in Kobaien - they work constantly under really challenging conditions, constantly dirty (and you can get an idea of just how dirty from Mr Aiba’s portrait below) and breathing in a mixture of hot air, oil and soot. (I spent all of 40’ total in the rooms and I could feel the effects for hours after - taking a shower will result in some really “interesting” bathwater. By the way, as you can see, the room is pitch black and let me tell you, the walls are not actually painted black - the colour is the accumulation of decades of flying soot and smoke.)
What’s worth mentioning is that in Kobaien they make each and every wick used in the process manually. This is because they need to have a very specific shape, consistency, density and be made out of the right materials to ensure a high quality soot is created. If the consistency is off, then different pots will generate different type and quality of soot resulting in less-than-desired quality of the final product, something completely unacceptable for Kobaien. The master here selects the fibres for the wicks himself, testing their strength and type and then carefully crafts each wick himself before using them in the smoke gathering process.
Photographically speaking, the atmosphere and overall conditions in the smoke collecting rooms is, well, challenging to say the least. Apart from the soot collecting underneath the pot covers, there are soot particles literally flying all through the air coating everything and everyone in and just outside the rooms - you go in there and I guarantee you, you’re coming out with soot in areas you never thought you’d have any. Because of the constant heat, these particles circulate and float constantly, so even the simple action of breathing or moving will send more particles into the air - I made the mistake of going in with light brown pants (mock all you want - I was stupid) and I came out, well, “camouflaged” in black. Not fun, but part and parcel of doing what I had gone there to do. By the way, the same goes for your equipment too - you will need to clean your cameras and lenses extensively after this, ideally before you return them to your bag (as this would move the soot there).
B. Preparing the Mixture
This stage is sometimes also referred to as “mixing glue” because, frankly, it involved creating a thick glue mixture and combining it with the soot to create the final “dough” which will then be used to create the sticks. I personally - perhaps I should say photographically - love this stage because it’s one of the most visually impressive and dynamic stages and to the prepared photographer offers near-unlimited opportunities for dozens of absolutely awesome shots.
Mr Hashiwada working against the clock as animal glue sticks are melted and mixed with water. The process is incredibly time sensitive (and very, very smelly)
The mixing stage is another time-sensitive and very delicate process as it involves melting thick, dried animal glue chunks (made from a wide variety of animals), each with different properties - consistency, thickness, fluidity, colour and much more - depending on the type of stick the company needs to make. Because different glue chunks melt at different heat points, have different tolerances to heat and external conditions, how this is done is absolutely critical, from the moment the process starts to the very end when the melted glue is removed from the heat and left to rest. It’s not unusual for the workers creating the mixture to alternate between slow gentle moves and frantic activity within the space of a couple of minutes.
Once the glue is melted it is mixed with perfumed oils because, let me tell you, the glue smells awful (and you really, really, do not want your customers gagging from the stench the moment they use the ink now, do you?)! The melted mixture is then allowed to set (and no, it does not harden instantly, it just gets thicker and more viscous. At some point it is mixed with the soot eventually creating a thick, Play-Doh like mixture which has a dark grey colour (think between dark-ish gunmetal and black) which is then left to rest for weeks (and sometimes months) depending on the type of mixture, environmental conditions and other factors. It is something the mixing master and the kneading master constantly review before deciding when the “dough” is ready for the next stage - kneading.
Photographically speaking, there are a number of challenges in this stage which can easily be overcome with sufficient preparation (and I do mean a lot of preparation and clear communication with the people on the ground), clever use of strobes (and yes, I did use the plural here!) and the ability to think on your feet and adjust in seconds. First and foremost, the usual “spray and pray” technique will not work. Because of the darkened environment, the variable external light (which is coming from behind you and bounding on dark wood walls) and the nature of billowing steam, simply shooting and hoping some light will sneak in and light your subject is naive and frankly, stupid. So you need a strobe. Having said that, I don’t think you need a super-powerful 1200ws strobe for this but this does not mean you can get away with a tiny flash - you can’t.
Glue is melted in some containers with water being heated in others and then the two are mixed together. The mixing must be done on time otherwise the result is problematic in terms of consistency and may need to be thrown away. Glue is very, very expensive.
I used two strobes: a 1200ws shot through a 120cm octa on the side and slightly in front and a 300ws with a reflector focused on where the worker was going to be. Now this potentially created a number of other issues such as over-lighting and creating hot-spots, of turning the steam into a massive diffuser/reflector panel and much more.
Luckily for me I had done incredibly exhaustive pre-vis and planning work on this and was prepared about all eventualities, including potential lighting ratios, light positioning etc so as steam started billowing out (and let me tell you, the steam went from zero to explosive in less than 10’’).
As a result I was able to shoot very quickly, adjust only once and get what I feel are really good shots and I absolutely love how the worker’s face clearly jumps out of the smoke, perfectly lit.
C. Kneading the Mixture
As already mentioned, once the soot is mixed with the glue, the mixture congeals into a thick, wax-like pliable paste which is packed in large chunks (think the size of a medium sack of garden compost). The mixture is then stored for a few weeks (different depending on the type of glue) until it homogenises and which point it is retrieved from storage and taken to kneading booths. There are three kneading booths in the factory, each “staffed” by a master - someone who has extensive experience with kneading the mixture, create and form the sticks and finish them.
This is by far the most involved part of the process as it requires a lot of manual effort, an enormous amount of skill and experience in every single stage. Let me try and outline those for you so you get the gist of it:
First the “dough” is split into smaller chunks (think the size of a solid brick) and is kneaded using a combination of hands and feet until it is soft and pliable. Seeing the process in action is actually quite mesmerising, especially when the master kneads the mixture using his feet - not only does he need to be strong and flexible, but also highly accurate and specific. Every move, every step, even position of his feet have a purpose and there’s a dance-like quality to this kneading process - the more I witnessed the more it seemed that the master was equally dexterous with his feet and hands and he was equally masterful (sorry for the pun) with both.
The dough chunks are then split into smaller and smaller pieces, weighed accurately (I should point out that this is done using ancient manual scales and considering the number of sticks which need to be created, sometimes getting the weight right means doing this in seconds and getting it right first time (before you even add the dough on the scales)
once the chunk size is, well, the right size, the master will then knead it some more, usually by hand, and then pop it into one of the many wooden moulds which he then slots under one of the many metal presses around him. The pressed moulds stay there for around 10’ each.
when each now-formed stick is ready it is extracted and finished by hand. When I say finished I mean the minute tasks the master does to make sure each stick is perfect. Using razor-sharp knives and scissors, he trims the edges to arrive at perfectly finished pieces he then puts aside ready for drying.
There are many challenges in photographing this part of the process, first and foremost because the whole process happens inside a tiny room, no more than 3m by 3m, jammed packed with metal presses of every size, storage areas and even elevated spaces you’re not allowed to step on with your shoes on. So, there’s barely enough room for the master and his implements, let alone a photographer and his or her tools. There are some good news of course: each room faces a massive glass window facing the courtyard letting in plenty of light (which can, of course, be super challenging when it’s a sunny day, so keep that in mind) and the presses are this wonderful worn metal which throws some awesome reflections and can create really interesting frames.
Me being me I wanted to control every single aspect of the scene, so I placed my strobe outside the window pointing in, shooting through a 150cm octa, emulating a nice soft overcast day light. This allowed me to use my VND to control the scene and allow my light to pick up what I wanted to. I would advise against using a wide angle lens (even though I know some readers here think the wide lens is the holy grail or lenses and a perfect fit for this - it is not). There are way too many visual distractions which will easily creep into every single frame, loads of straight lines which will curve every which way but loose and make shots look like they’re inside of a fishbowl. Also, don’t forget that it’s a privilege to be in that room so having to constantly push into the master’s working area simply to satisfy your creative approaches - respect is key here.
Both masters I met were very serious, absolutely focused and, frankly, a bit remote and stern. No smiles and certainly little willingness to accommodate the photographer moving around them. Completely no-nonsense which I feel comes across in the shots. Unfortunately, while there were “happy” to accommodate an hour-long shoot with lights and everything, they drew the line at stopping for portraits. It is what it is and sometimes you need to accept what you get and work with it.
D. Drying
Drying the ink sticks comes in two stages and, honestly, the first stage is by far the more visually interesting. The second, while beautiful in its way, it’s almost passive. But I’ll explain and let you be the judge of this.
First comes the “drying in oak ash” stage. This is, in a way, exactly what it sounds like. The sticks are placed in layers in large wooden crates, covered in newspaper and then covered over in oak ash. Obviously ash cannot touch the sticks as it would stick to the wet-ish surface and will be impossible to clean - hence the newspaper layer. Each crate holds anything between 4 and 6 layers of sticks. What makes this stage absolutely insane is that these crates need to be refreshed/recycled every day or so and this means exactly what it sounds like: every day or two, each crate has the ash removed, the newspaper sheets taken off (and discarded), the sticks removed and then the process reversed with fresh newspaper and dry ash. Think about it - every day someone has to empty and then refill those crates. And, in the meantime, the ash is placed in massive kilns where it is baked so it is dry enough to reuse. There is ash in the workshop which has been around for decades!
This is by far the most hostile environment for a photographer and his equipment. The oak ash is so insanely fine that even walking through the area makes dust fly out and it gets everywhere. Trying to dust yourself makes everything even worse, let alone touching any surface (all of which are coated with fine dust). Let me tell you, in the 80’ we spent shooting in there every single item in my back, my stand back and light was absolutely covered with it…
But it’s a beautiful place to shoot in and there are some beautiful shots to be had there - loads of beautiful colour, nice soft bounce lighting and all those things that come with it. You can create loads of mysticism, dark corners and soft lighting - assuming you use a light and are willing to play around with your settings to manage the ambient. Don’t get me wrong, this is naturally a dark and low room and it’s lit with a couple of powerful fluorescent lights, throwing yet another variable in your lighting equation. Attempting to play with your white balance and shoot ambient light will generate a whole host of problems you’d need to later address in post. Obviously I’m not saying that you can only shoot here using strobes - not at all. I’m simply making you aware of the challenges so you can potentially make up your own mind and plan your own strategy.
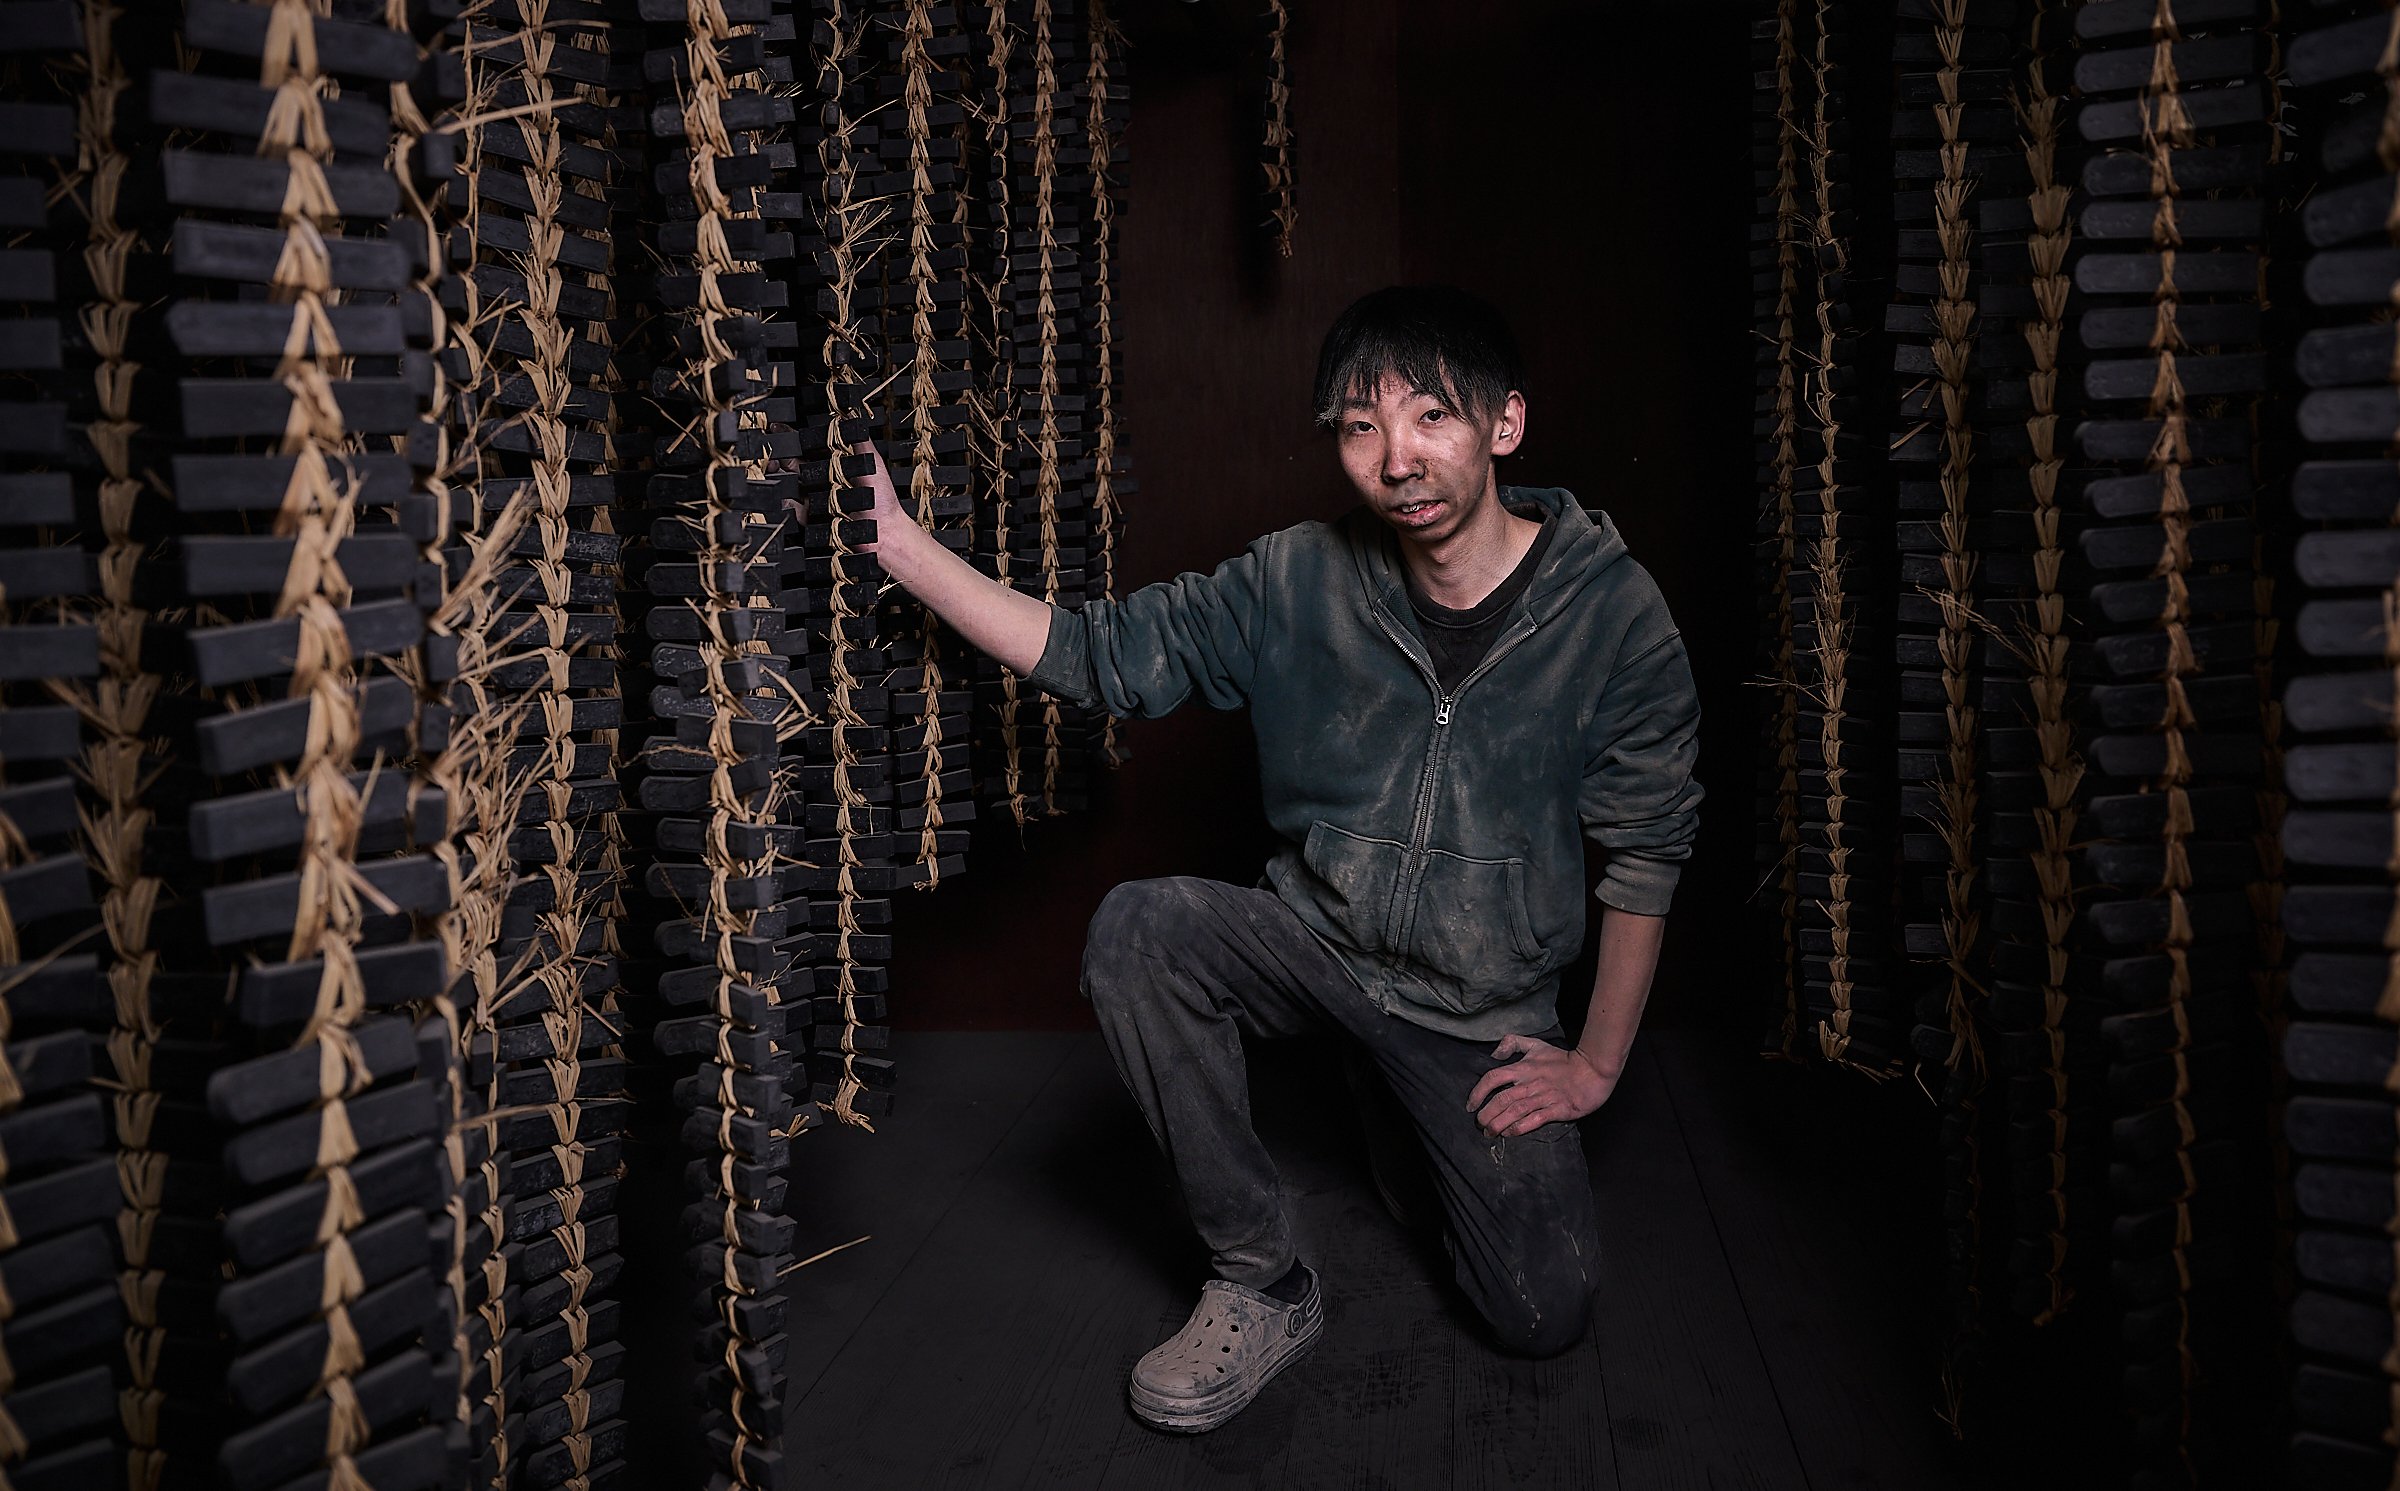
The second drying stage is the air-drying which is, frankly, what it says: the ash-dried sticks are now hung in special rooms for up to a year. Significant effort is made to prepare as many sticks as possible before the onset of winter so they spend the first few months hanging in the cold winter air which ensures a more stable and consistent drying before the onset of the warmer (and much more humid) spring and summer weather roll on. The hanging strips of drying sticks (tied together with straw) look absolutely beautiful and I was lucky to come across two full drying rooms which helped create some great visuals.
However photographing these rooms and sticks can be a bit challenging - the room itself is much smaller than I pictured initially and the floor is actually higher up (meaning the ceiling is less than 180cm) and, more importantly, does not lend itself to human presence. After all, this is the place the sticks come to “rest” without anyone interfering with them - it does not make much sense for someone to be walking or standing around or, frankly, actually working on the sticks. Still, if you have the tools (and yes, annoyingly enough, I’m talking about strobes) you can create interesting images with the help of the amazing people of Kobaien.
E. Other Stages
There’s one final stage which I was not fortunate enough to witness and that is the painting of the sticks. This happens only on certain times of the month and it involves yet another specialist, a master, who hand paints each stick. Some sticks only get a light paint on the kanji on their face, others get full custom paint jobs, including coloured scenes, figures and other complex designs which, naturally, massively increase the price. There are sticks in there which cost thousands of dollars and let me tell you, they’re worth it!
A few closing words on the overall project….
I am incredibly humbled and honoured that Ichi and Kobaien chose to work with me in this project. Their commitment to this, the incredible hard work Keitaro and Kojima put together in working with me to narrow down and specify the shooting schedule, to translating my detailed notes and requirements to Japanese and working with the people in Kobaien to ensure everyone was aware and ready for this and the very fact that two senior managers travelled all the way from Tokyo to Nara to be with me during the shooting days shows the immense professionalism and attention to detail of the Japanese people. I will forever be grateful to them.
I was also awed by the joy, interest and curiosity the various workers and masters showed in the process. Photographers are not normally given this level of access to the factory (even though the factory does offer tours of the facility and you can possibly catch glimpses of the process, you certainly wont be able to take any serious photos during these normal tours) and the fact I was able to spend more than a day embedded in the process and experiencing its every aspect, working side-by-side with amazing people was something the still makes me feel warm inside (even though it was freezing those days!) We are currently working on putting together another three projects with Ichi on some of their other traditional companies and I have to tell you, it trumps any exotic trip!
I wish I could say that the project presented a thousand challenges or whatever, to make the end result seem more like a huge success, but the truth is that after weeks of planning, of research, sketching and previsualisation, the shots themselves happened very smoothly and organically. My sketches helped enormously in conveying my ideas to the people (and those sketches were the source of a LOT of hilarity, let me tell you!) and we were able to craft each image quickly and fluidly with minimal stress (for which I’m unfortunately infamously known for!). Furthermore, the images needed minimal post-processing (if any) which makes me feel even better inside.


I’d like to close out this by saying an enormous thanks to everyone who worked with me on this project: Keitaro for making it possible - none of these images would have ever been possible without him. Kojima for his overall support, encouragement and his choice of sake during our lunch - awesome!

Ms Shoko Matsui, the President of Kobaien for her humour and the most infectious smile I’ve seen in a long time. And, of course, the specialists at every stage: Mr Aiba for showing us how to gather smoke and make wicks - his smiling face through all the soot still brings a smile to my face. Mr Hashiwada for showing us the mixing glue and drying processes and for being so willing to pose for awesome portraits. And Master Motohashi for putting up with me shooting tons of images while he was kneading the dough and forming the sticks. Legends all of them.
